React 生命周期
React 类组件为开发者提供了一些生命周期钩子函数,能让开发者在 React 执行的重要阶段,在钩子函数里做一些该做的事。自从 React Hooks 问世以来,函数组件也能优雅地使用 Hooks ,弥补函数组件没有生命周期的缺陷。
类组件生命周期
React 两个重要阶段 render 和 commit
React 在调和( render )阶段会深度遍历 React fiber 树,目的就是发现不同( diff ),不同的地方就是接下来需要更新的地方,对于变化的组件,就会执行 render 函数。在一次调和过程完毕之后,就到了commit 阶段,commit 阶段会创建修改真实的 DOM 节点。
如果在一次调和的过程中,发现了一个 fiber tag = 1 类组件的情况,就会按照类组件的逻辑来处理。
对于类组件的处理逻辑,首先判断类组件是否已经被创建过,首先来看看源码里怎么写的。
react-reconciler/src/ReactFiberBeginWork.js
/* workloop React 处理类组件的主要功能方法 */
function updateClassComponent(){
    let shouldUpdate
    const instance = workInProgress.stateNode // stateNode 是 fiber 指向 类组件实例的指针。
     if (instance === null) { // instance 为组件实例,如果组件实例不存在,证明该类组件没有被挂载过,那么会走初始化流程
        constructClassInstance(workInProgress, Component, nextProps); // 组件实例将在这个方法中被new。
        mountClassInstance(  workInProgress,Component, nextProps,renderExpirationTime ); //初始化挂载组件流程
        shouldUpdate = true; // shouldUpdate 标识用来证明 组件是否需要更新。
     }else{
        shouldUpdate = updateClassInstance(current, workInProgress, Component, nextProps, renderExpirationTime) // 更新组件流程
     }
     if(shouldUpdate){
         nextChildren = instance.render(); /* 执行render函数 ,得到子节点 */
        reconcileChildren(current,workInProgress,nextChildren,renderExpirationTime) /* 继续调和子节点 */
     }
}
概念:
instance类组件对应实例。workInProgress树,当前正在调和的 fiber 树 ,一次更新中,React 会自上而下深度遍历子代 fiber ,如果遍历到一个 fiber ,会把当前 fiber 指向 workInProgress。current树,在初始化更新中,current = null ,在第一次 fiber 调和之后,会将 workInProgress 树赋值给 current 树。React 来用workInProgress 和 current 来确保一次更新中,快速构建,并且状态不丢失。Component就是项目中的 class 组件。nextProps作为组件在一次更新中新的 props 。renderExpirationTime作为下一次渲染的过期时间。
在组件实例上可以通过 _reactInternals 属性来访问组件对应的 fiber 对象。在 fiber 对象上,可以通过 stateNode 来访问当前 fiber 对应的组件实例。两者的关系如下图所示: 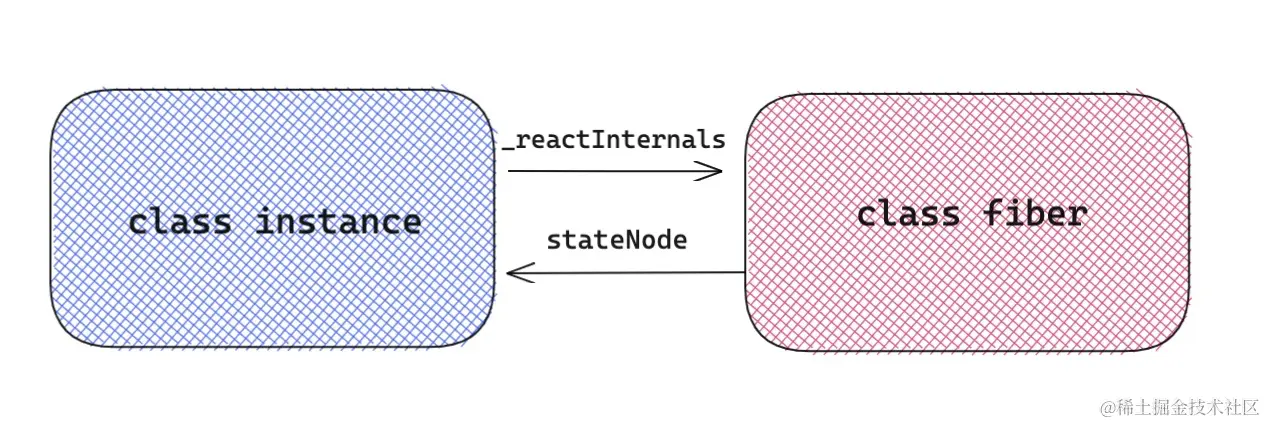
React 类组件生命周期执行过程探秘
React 的大部分生命周期的执行,都在 mountClassInstance 和updateClassInstance 这两个方法中执行
可以将流程简化成 mount (初始化渲染) 和 update (更新)两个方向
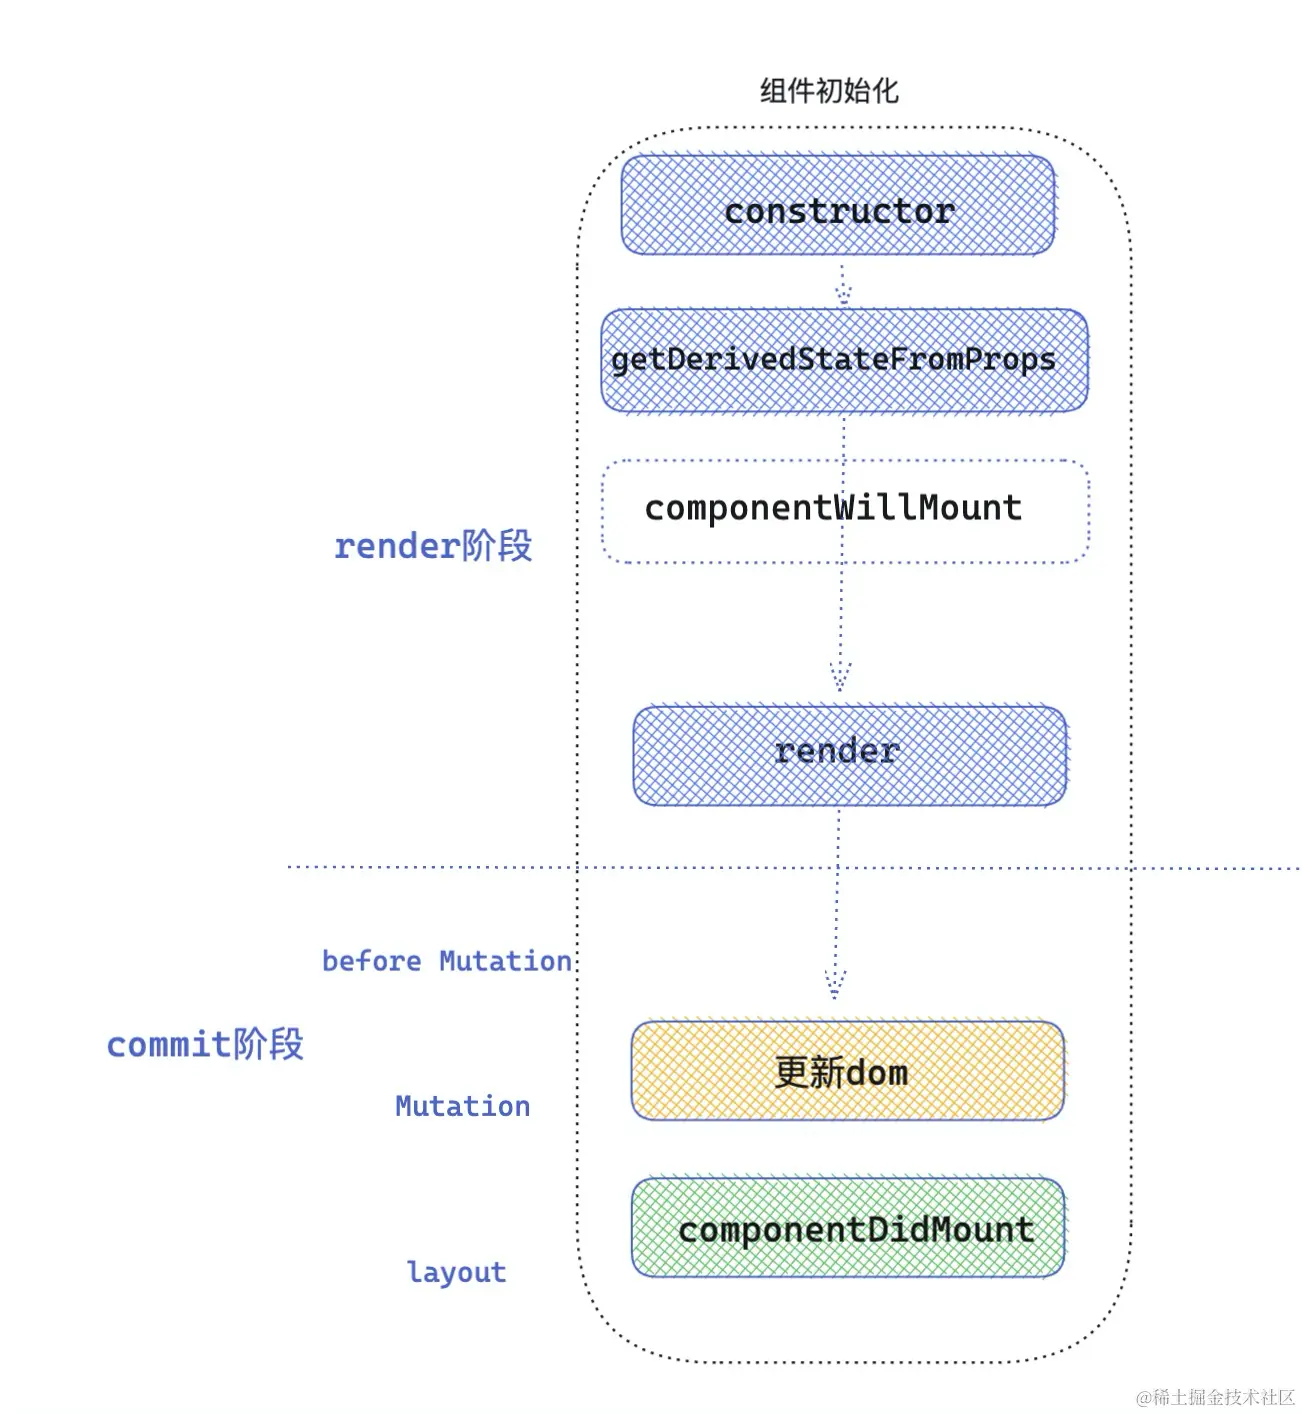
初始化阶段
- constructor 执行
在 mount 阶段,首先执行的 constructClassInstance 函数,用来实例化 React 组件
在实例化组件之后,会调用 mountClassInstance 组件初始化。
react-reconciler/src/ReactFiberClassComponent.js
function mountClassInstance(workInProgress,ctor,newProps,renderExpirationTime){
    const instance = workInProgress.stateNode;
     const getDerivedStateFromProps = ctor.getDerivedStateFromProps;
  if (typeof getDerivedStateFromProps === 'function') { /* ctor 就是我们写的类组件,获取类组件的静态方法 */
     const partialState = getDerivedStateFromProps(nextProps, prevState); /* 这个时候执行 getDerivedStateFromProps 生命周期 ,得到将合并的state */
     const memoizedState = partialState === null || partialState === undefined ? prevState : Object.assign({}, prevState, partialState); // 合并state
     workInProgress.memoizedState = memoizedState;
     instance.state = workInProgress.memoizedState; /* 将state 赋值给我们实例上,instance.state  就是我们在组件中 this.state获取的state*/
  }
  if(typeof ctor.getDerivedStateFromProps !== 'function' &&   typeof instance.getSnapshotBeforeUpdate !== 'function' && typeof instance.componentWillMount === 'function' ){
      instance.componentWillMount(); /* 当 getDerivedStateFromProps 和 getSnapshotBeforeUpdate 不存在的时候 ,执行 componentWillMount*/
  }
}- getDerivedStateFromProps 执行
在初始化阶段,getDerivedStateFromProps 是第二个执行的生命周期,值得注意的是它是从 ctor 类上直接绑定的静态方法,传入 props ,state 。 返回值将和之前的 state 合并,作为新的 state ,传递给组件实例使用。
- componentWillMount 执行
如果存在 getDerivedStateFromProps 和 getSnapshotBeforeUpdate 就不会执行生命周期componentWillMount。
- render 执行
到此为止 mountClassInstancec 函数完成,但是上面 updateClassComponent 函数, 在执行完 mountClassInstancec 后,执行了 render 渲染函数,形成了 children , 接下来 React 调用 reconcileChildren 方法深度调和 children 。
- componentDidMount 执行
上述提及的几个生命周期都是在 render 阶段执行的。一旦 React 调和完所有的 fiber 节点,就会到 commit 阶段,在组件初始化 commit 阶段,会调用 componentDidMount 生命周期。
react-reconciler/src/ReactFiberCommitWork.js
function commitLifeCycles(finishedRoot,current,finishedWork){
     switch (finishedWork.tag){                             /* fiber tag 在第一节讲了不同fiber类型 */
        case ClassComponent: {                              /* 如果是 类组件 类型 */
             const instance = finishedWork.stateNode        /* 类实例 */
             if(current === null){                          /* 类组件第一次调和渲染 */
                instance.componentDidMount()
             }else{                                         /* 类组件更新 */
                instance.componentDidUpdate(prevProps,prevState,instance.__reactInternalSnapshotBeforeUpdate);
             }
        }
     }
}
从上面可以直观看到 componentDidMount 执行时机 和 componentDidUpdate 执行时机是相同的 ,只不过一个是针对初始化,一个是针对组件再更新。到此初始化阶段,生命周期执行完毕。
执行顺序:constructor -> getDerivedStateFromProps / componentWillMount -> render -> componentDidMount
更新阶段
接下来为一次类组件的更新阶段,到底会执行那些生命周期函数呢,回到了最开始 updateClassComponent 函数了,当发现 current 不为 null 的情况时,说明该类组件被挂载过,那么直接按照更新逻辑来处理。
react-reconciler/src/ReactFiberClassComponent.js
function updateClassInstance(current,workInProgress,ctor,newProps,renderExpirationTime){
    const instance = workInProgress.stateNode; // 类组件实例
    const hasNewLifecycles =  typeof ctor.getDerivedStateFromProps === 'function'  // 判断是否具有 getDerivedStateFromProps 生命周期
    if(!hasNewLifecycles && typeof instance.componentWillReceiveProps === 'function' ){
         if (oldProps !== newProps || oldContext !== nextContext) {     // 浅比较 props 不相等
            instance.componentWillReceiveProps(newProps, nextContext);  // 执行生命周期 componentWillReceiveProps
         }
    }
    let newState = (instance.state = oldState);
    if (typeof getDerivedStateFromProps === 'function') {
        ctor.getDerivedStateFromProps(nextProps,prevState)  /* 执行生命周期getDerivedStateFromProps  ,逻辑和mounted类似 ,合并state  */
        newState = workInProgress.memoizedState;
    }
    let shouldUpdate = true
    if(typeof instance.shouldComponentUpdate === 'function' ){ /* 执行生命周期 shouldComponentUpdate 返回值决定是否执行render ,调和子节点 */
        shouldUpdate = instance.shouldComponentUpdate(newProps,newState,nextContext,);
    }
    if(shouldUpdate){
        if (typeof instance.componentWillUpdate === 'function') {
            instance.componentWillUpdate(); /* 执行生命周期 componentWillUpdate  */
        }
    }
    return shouldUpdate
}- 执行生命周期 componentWillReceiveProps
首先判断 getDerivedStateFromProps 生命周期是否存在,如果不存在就执行 componentWillReceiveProps 生命周期。传入该生命周期两个参数,分别是 newProps 和 nextContext 。
- 执行生命周期 getDerivedStateFromProps
接下来执行生命周期 getDerivedStateFromProps, 返回的值用于合并state,生成新的state。
- 执行生命周期 shouldComponentUpdate
接下来执行生命周期 shouldComponentUpdate,传入新的 props ,新的 state ,和新的 context ,返回值决定是否继续执行 render 函数,调和子节点。这里应该注意一个问题,getDerivedStateFromProps 的返回值可以作为新的 state ,传递给 shouldComponentUpdate 。
- 执行生命周期 componentWillUpdate
接下来执行生命周期 componentWillUpdate。updateClassInstance 方法到此执行完毕了。
- 执行 render 函数
接下来会执行 render 函数,得到最新的 React element 元素。然后继续调和子节点。
- 执行 getSnapshotBeforeUpdate
react-reconciler/src/ReactFiberCommitWork.js
function commitBeforeMutationLifeCycles(current,finishedWork){
     switch (finishedWork.tag) {
          case ClassComponent:{
               const snapshot = instance.getSnapshotBeforeUpdate(prevProps,prevState) /* 执行生命周期 getSnapshotBeforeUpdate   */
                instance.__reactInternalSnapshotBeforeUpdate = snapshot; /* 返回值将作为 __reactInternalSnapshotBeforeUpdate 传递给 componentDidUpdate 生命周期  */
          }
     }
}
getSnapshotBeforeUpdate 的执行也是在 commit 阶段,commit 阶段细分为 before Mutation( DOM 修改前),Mutation ( DOM 修改),Layout( DOM 修改后) 三个阶段,getSnapshotBeforeUpdate 发生在before Mutation 阶段,生命周期的返回值,将作为第三个参数 __reactInternalSnapshotBeforeUpdate 传递给 componentDidUpdate 。
- 执行 componentDidUpdate
接下来执行生命周期 componentDidUpdate ,此时 DOM 已经修改完成。可以操作修改之后的 DOM 。到此为止更新阶段的生命周期执行完毕。
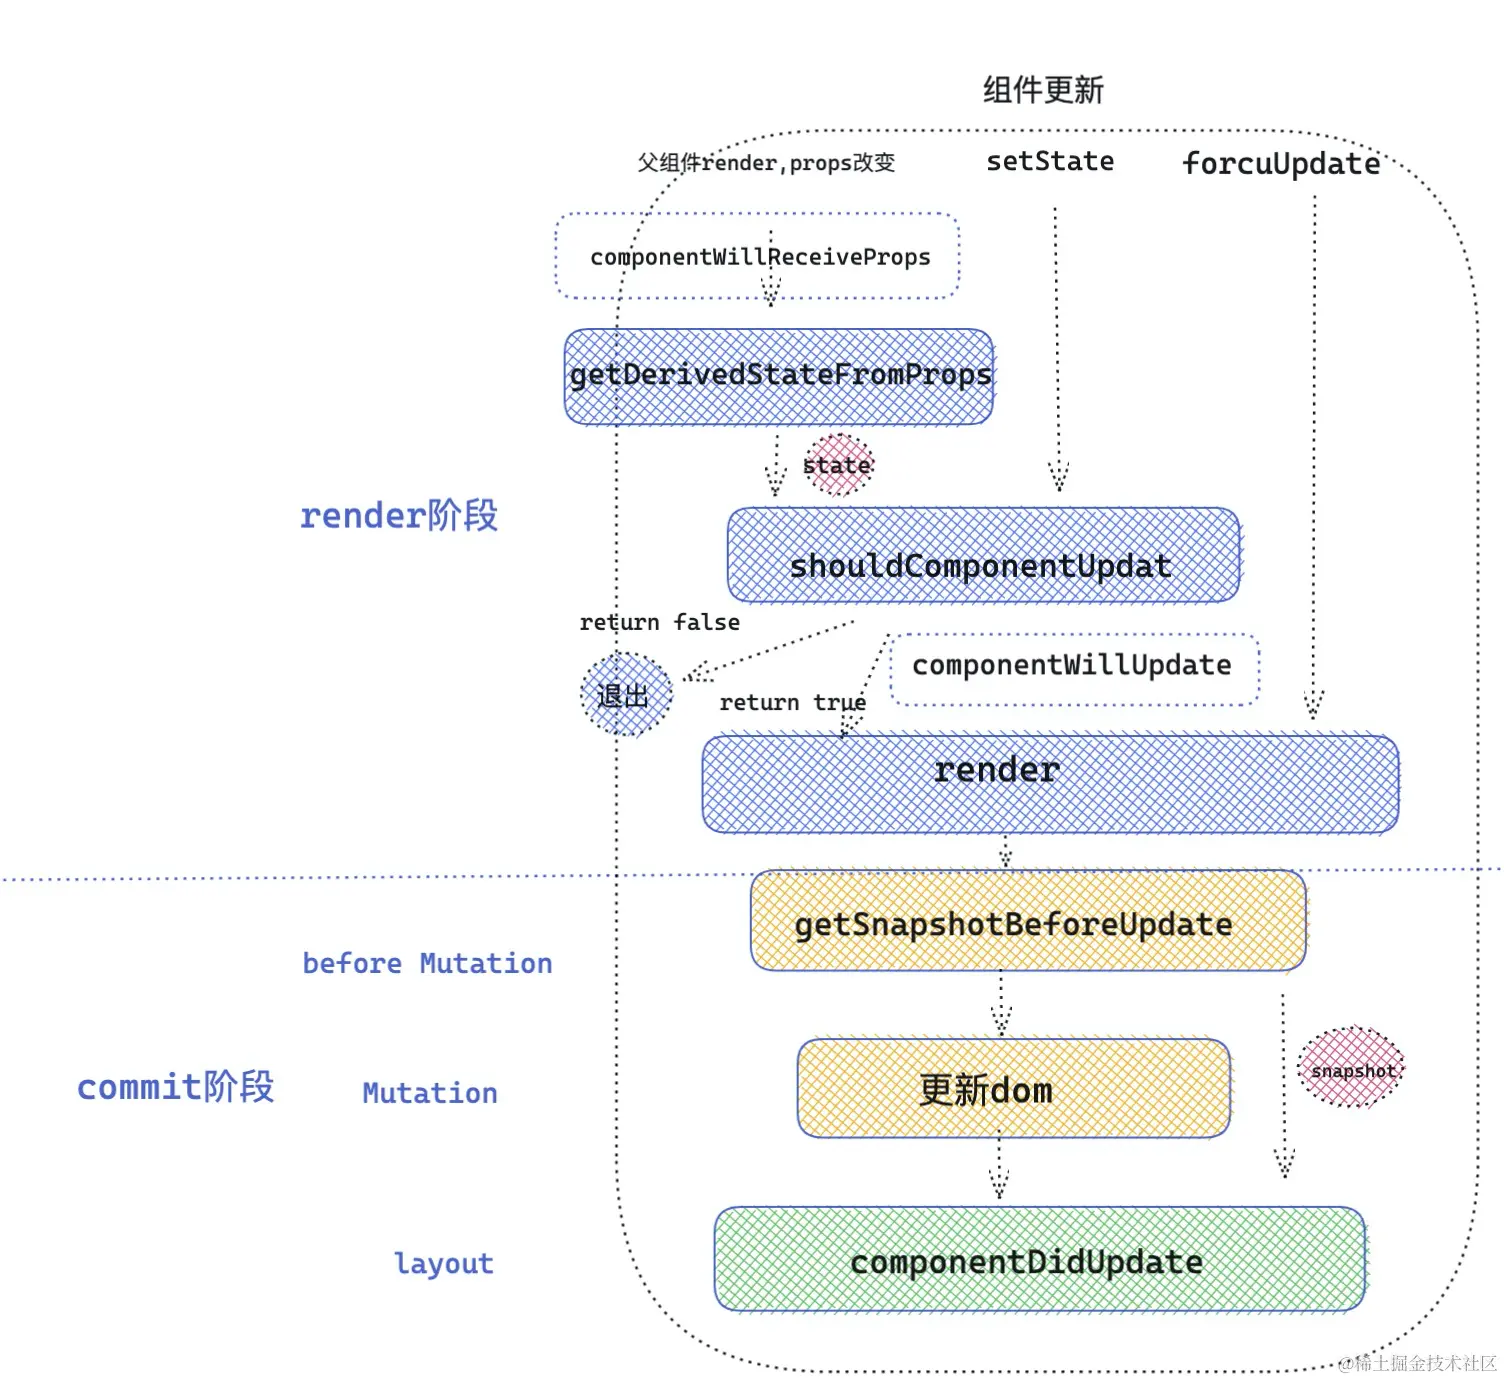
更新阶段对应的生命周期的执行顺序:
componentWillReceiveProps( props 改变) / getDerivedStateFromProp -> shouldComponentUpdate -> componentWillUpdate -> render -> getSnapshotBeforeUpdate -> componentDidUpdate
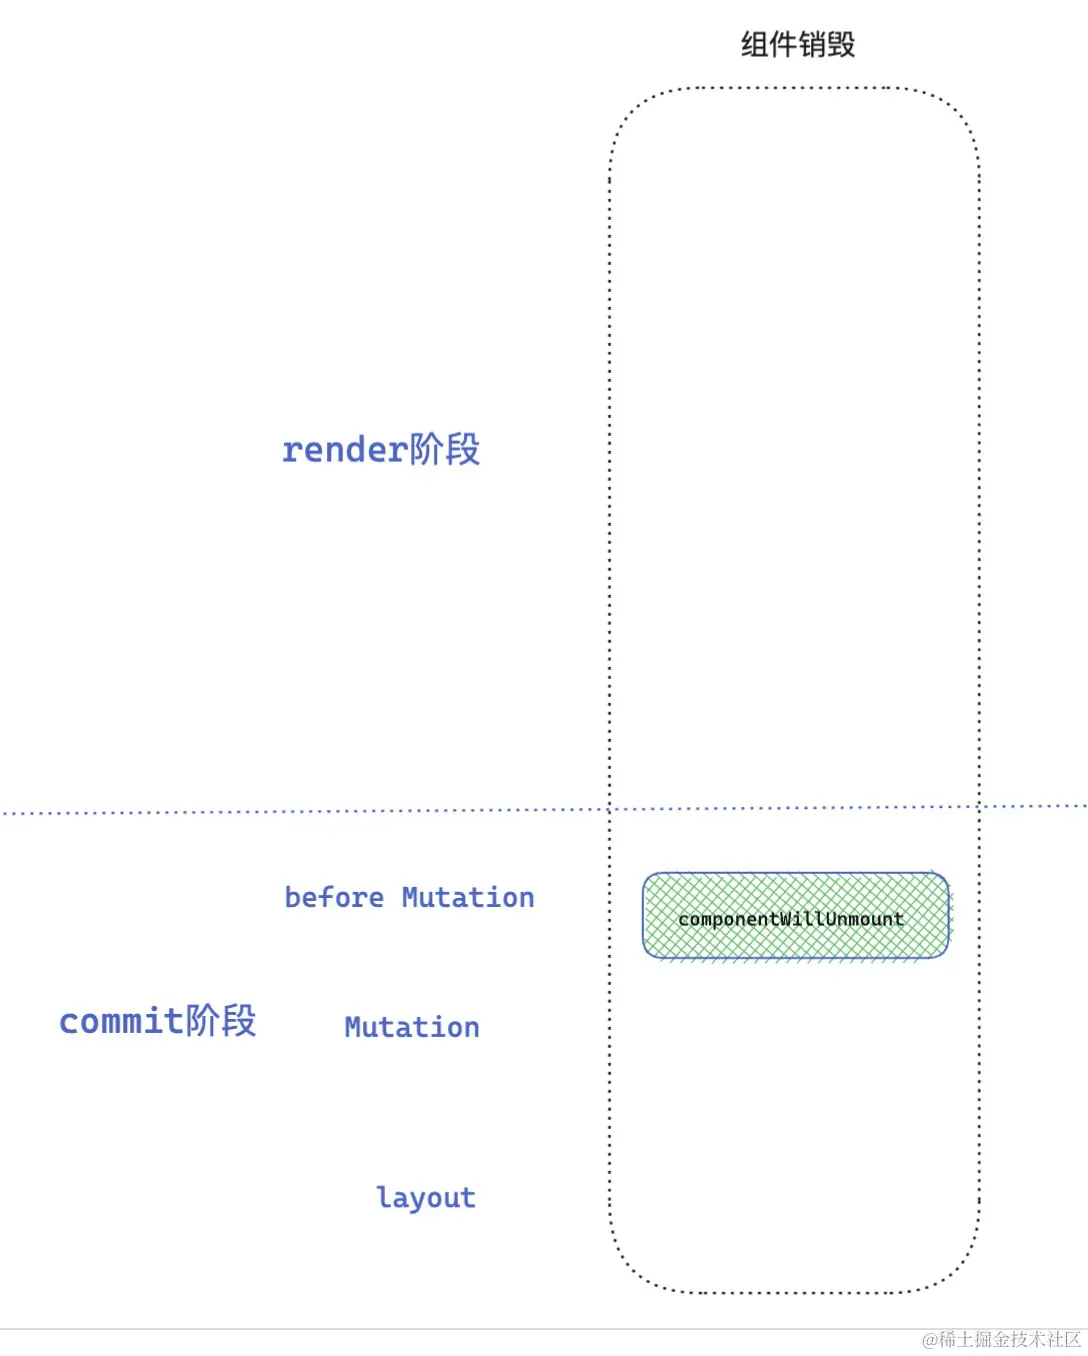
销毁阶段
react-reconciler/src/ReactFiberCommitWork.js
function callComponentWillUnmountWithTimer(){
    instance.componentWillUnmount();
}- 执行生命周期 componentWillUnmount
销毁阶段就比较简单了,在一次调和更新中,如果发现元素被移除,就会打对应的 Deletion 标签 ,然后在 commit 阶段就会调用 componentWillUnmount 生命周期,接下来统一卸载组件以及 DOM 元素。
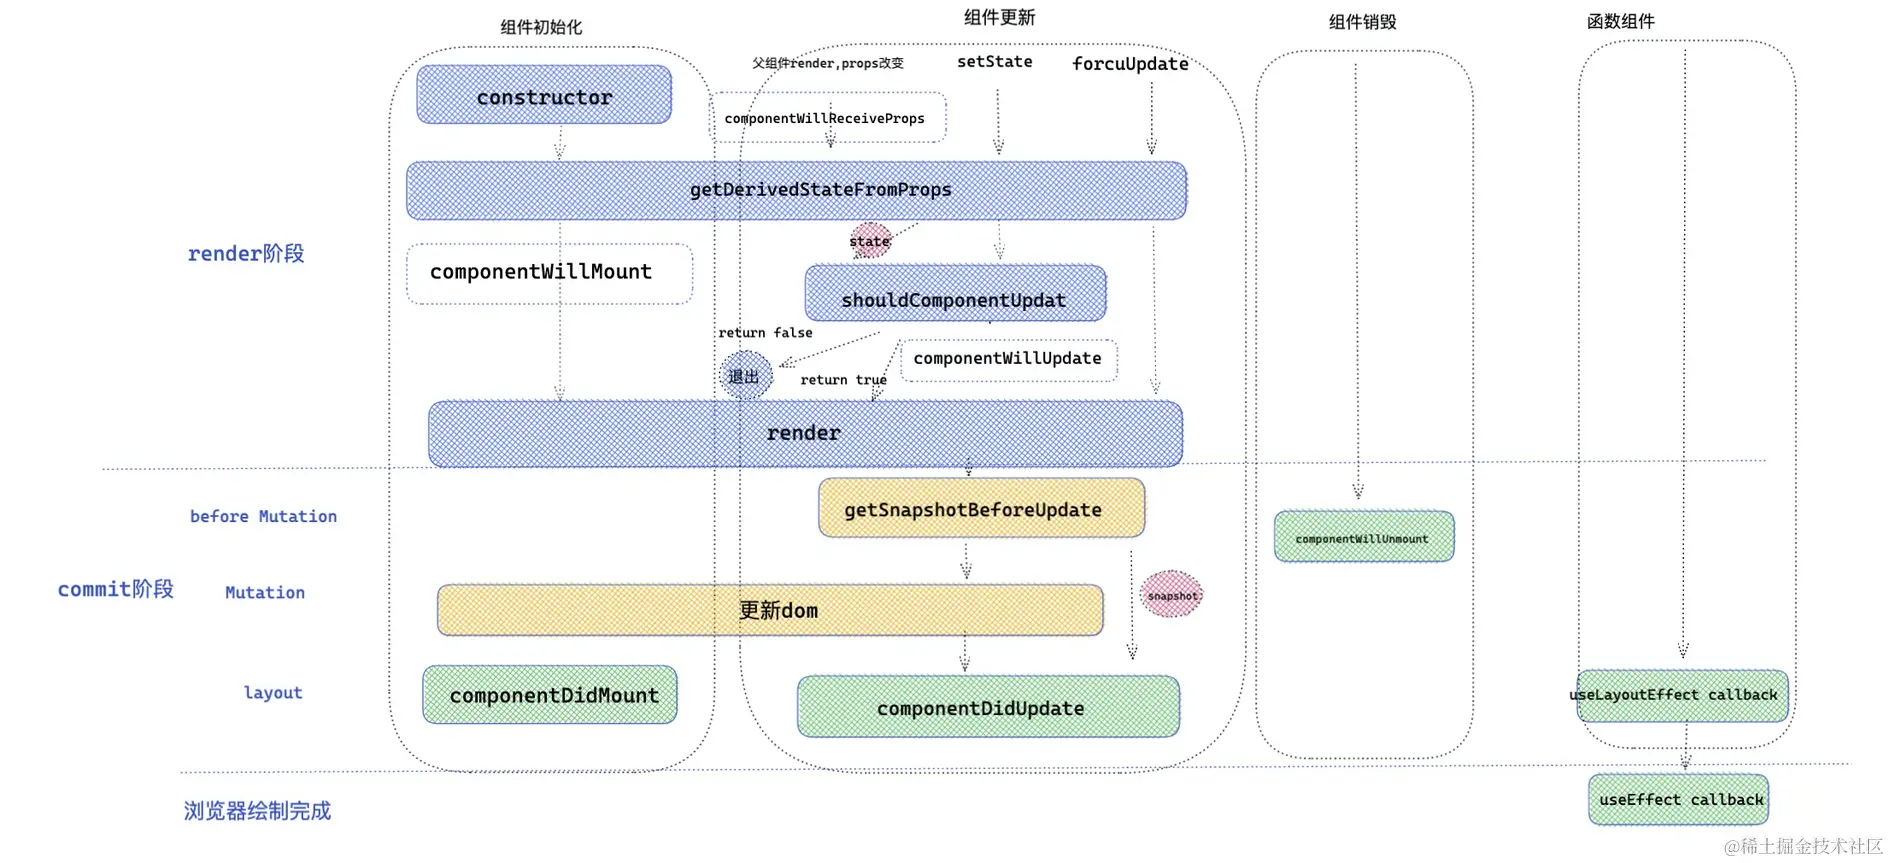
三个阶段生命周期+无状态组件总览图:
函数组件生命周期替代方案
React hooks也提供了 api ,用于弥补函数组件没有生命周期的缺陷。其原理主要是运用了 hooks 里面的 useEffect 和 useLayoutEffect
useEffect 和 useLayoutEffect'
useEffect
useEffect(()=>{
    return destory
},dep)
useEffect 第一个参数 callback, 返回的 destory , destory 作为下一次callback执行之前调用,用于清除上一次 callback 产生的副作用。
第二个参数作为依赖项,是一个数组,可以有多个依赖项,依赖项改变,执行上一次callback 返回的 destory ,和执行新的 effect 第一个参数 callback 。
对于 useEffect 执行, React 处理逻辑是采用异步调用 ,对于每一个 effect 的 callback, React 会向 setTimeout回调函数一样,放入任务队列,等到主线程任务完成,DOM 更新,js 执行完成,视图绘制完毕,才执行。所以 effect 回调函数不会阻塞浏览器绘制视图。
useLayoutEffect
useLayoutEffect 和 useEffect 不同的地方是采用了同步执行
- 首先
useLayoutEffect是在 DOM 更新之后,浏览器绘制之前,这样可以方便修改 DOM,获取 DOM 信息,这样浏览器只会绘制一次,如果修改 DOM 布局放在useEffect,那useEffect执行是在浏览器绘制视图之后,接下来又改 DOM ,就可能会导致浏览器再次回流和重绘。而且由于两次绘制,视图上可能会造成闪现突兀的效果。 useLayoutEffect callback中代码执行会阻塞浏览器绘制。
一句话概括如何选择 useEffect 和 useLayoutEffect :修改 DOM ,改变布局就用 useLayoutEffect ,其他情况就用 useEffect 。